A ComboBox control allows you to make a selection from a dropdown list of choices. You can populate a ComboBox from a variety of sources including static initialization in the code or fetching the items dynamically from a database just to name a few. These methods have their advantages and appropriate uses within your code. Populating a ComboBox via property App.config file settings allows you to add or remove items while eliminating the need to recompile the code. Changes to the ComboBox items list will take effect when you restart the program. The following video demonstrates how to create App.config settings and use them to populate the ComboBox items list.
The Video Shows Guides You Step-by-Step!
Essentially, you’ll need to open the project Settings and create the required setting entry as shown in figure 1.
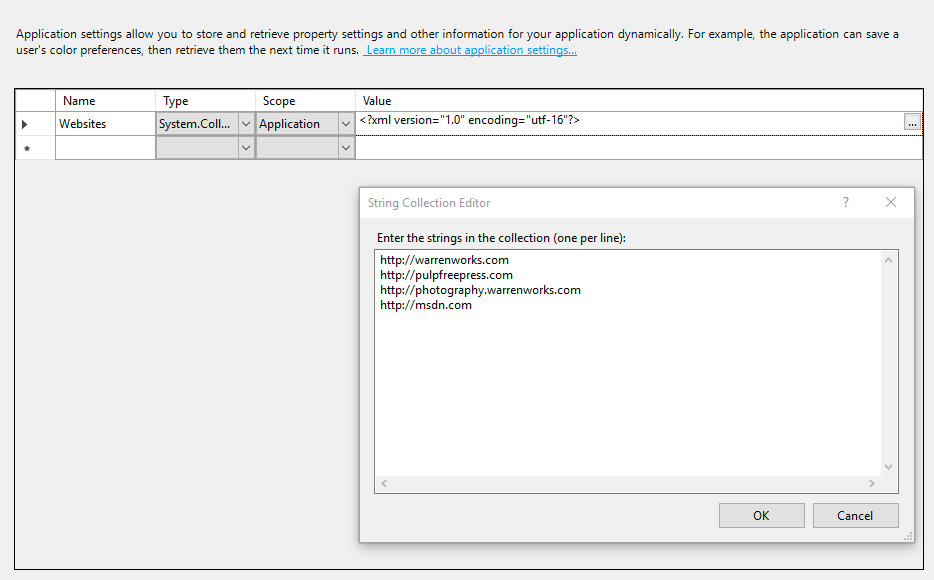
Figure 1: Entering Settings
In figure 1 – The setting name is WebSites, the type is System.Collections.Specialized.StringCollection, the Scope is set to Application, and the item values are listed as:
- http://warrenworks.com
- https://pulpfreepress.com
- http://photography.warrenworks.com
- http://msdn.com
Save the Settings.settings file and verify they were properly created in the App.config file as is shown in figure 2.
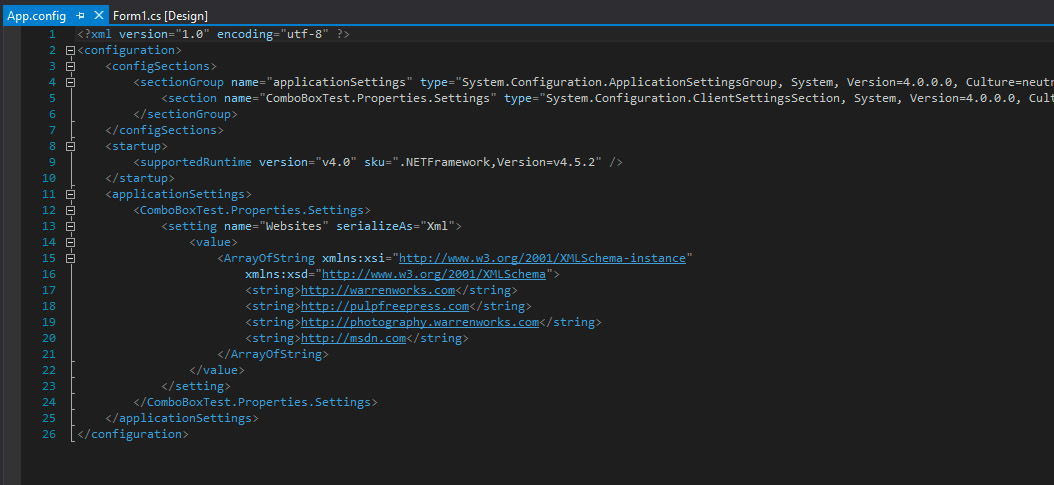
Figure 2 – Verifying App.config Fileg App Config File
Well, that diagram is a wee bit tiny, sorry about that. Here’s the code:
<applicationSettings>
        <ComboBoxTest.Properties.Settings>
            <setting name="Websites" serializeAs="Xml">
                <value>
                    <ArrayOfString xmlns:xsi="http://www.w3.org/2001/XMLSchema-instance"
                        xmlns:xsd="http://www.w3.org/2001/XMLSchema">
                        <string>http://warrenworks.com</string>
                        <string>https://pulpfreepress.com</string>
                        <string>http://photography.warrenworks.com</string>
                        <string>http://msdn.com</string>
                    </ArrayOfString>
                </value>
            </setting>
        </ComboBoxTest.Properties.Settings>
    </applicationSettings>
Next, you’ll need to use the setting to populate the ComboBox.Items property, which is simply a collection of objects. Here’s the code for a method named “InitializeComboBox()”:
private void InitializeComboBox()
  {
     foreach(string s in Properties.Settings.Default.Websites)
     {
       websiteComboBox.Items.Add(s);
     }
       websiteComboBox.SelectedIndex = 0;
       websiteComboBox.SelectedIndexChanged += ComboBoxIndexChangedEventHandler;
   }
You’ll notice above that in the foreach statement you use the Properties.Settings.Default property to access application settings. In this case we’re interested in the Websites setting, which provides us a list of strings. The last two lines in the method 1) set the ComboBox item to display when the control initially renders, and 2) wires up the event handler named ComboBoxIndexChangedEventHander, which is assigned to the websiteComboBox.SelectedIndexChanged event. Once the InitializeComboBox() method is complete, it needs to be added to the form’s constructor. You can download the Visual Studio project for this example here: https://github.com/pulpfreepress/ITP-136/tree/main/source_code_samples/ComboBoxTest
Rick Miller
Falls Church, Virginia